Frequently asked questions (FAQs)
Select your product
Socketed EVSxx
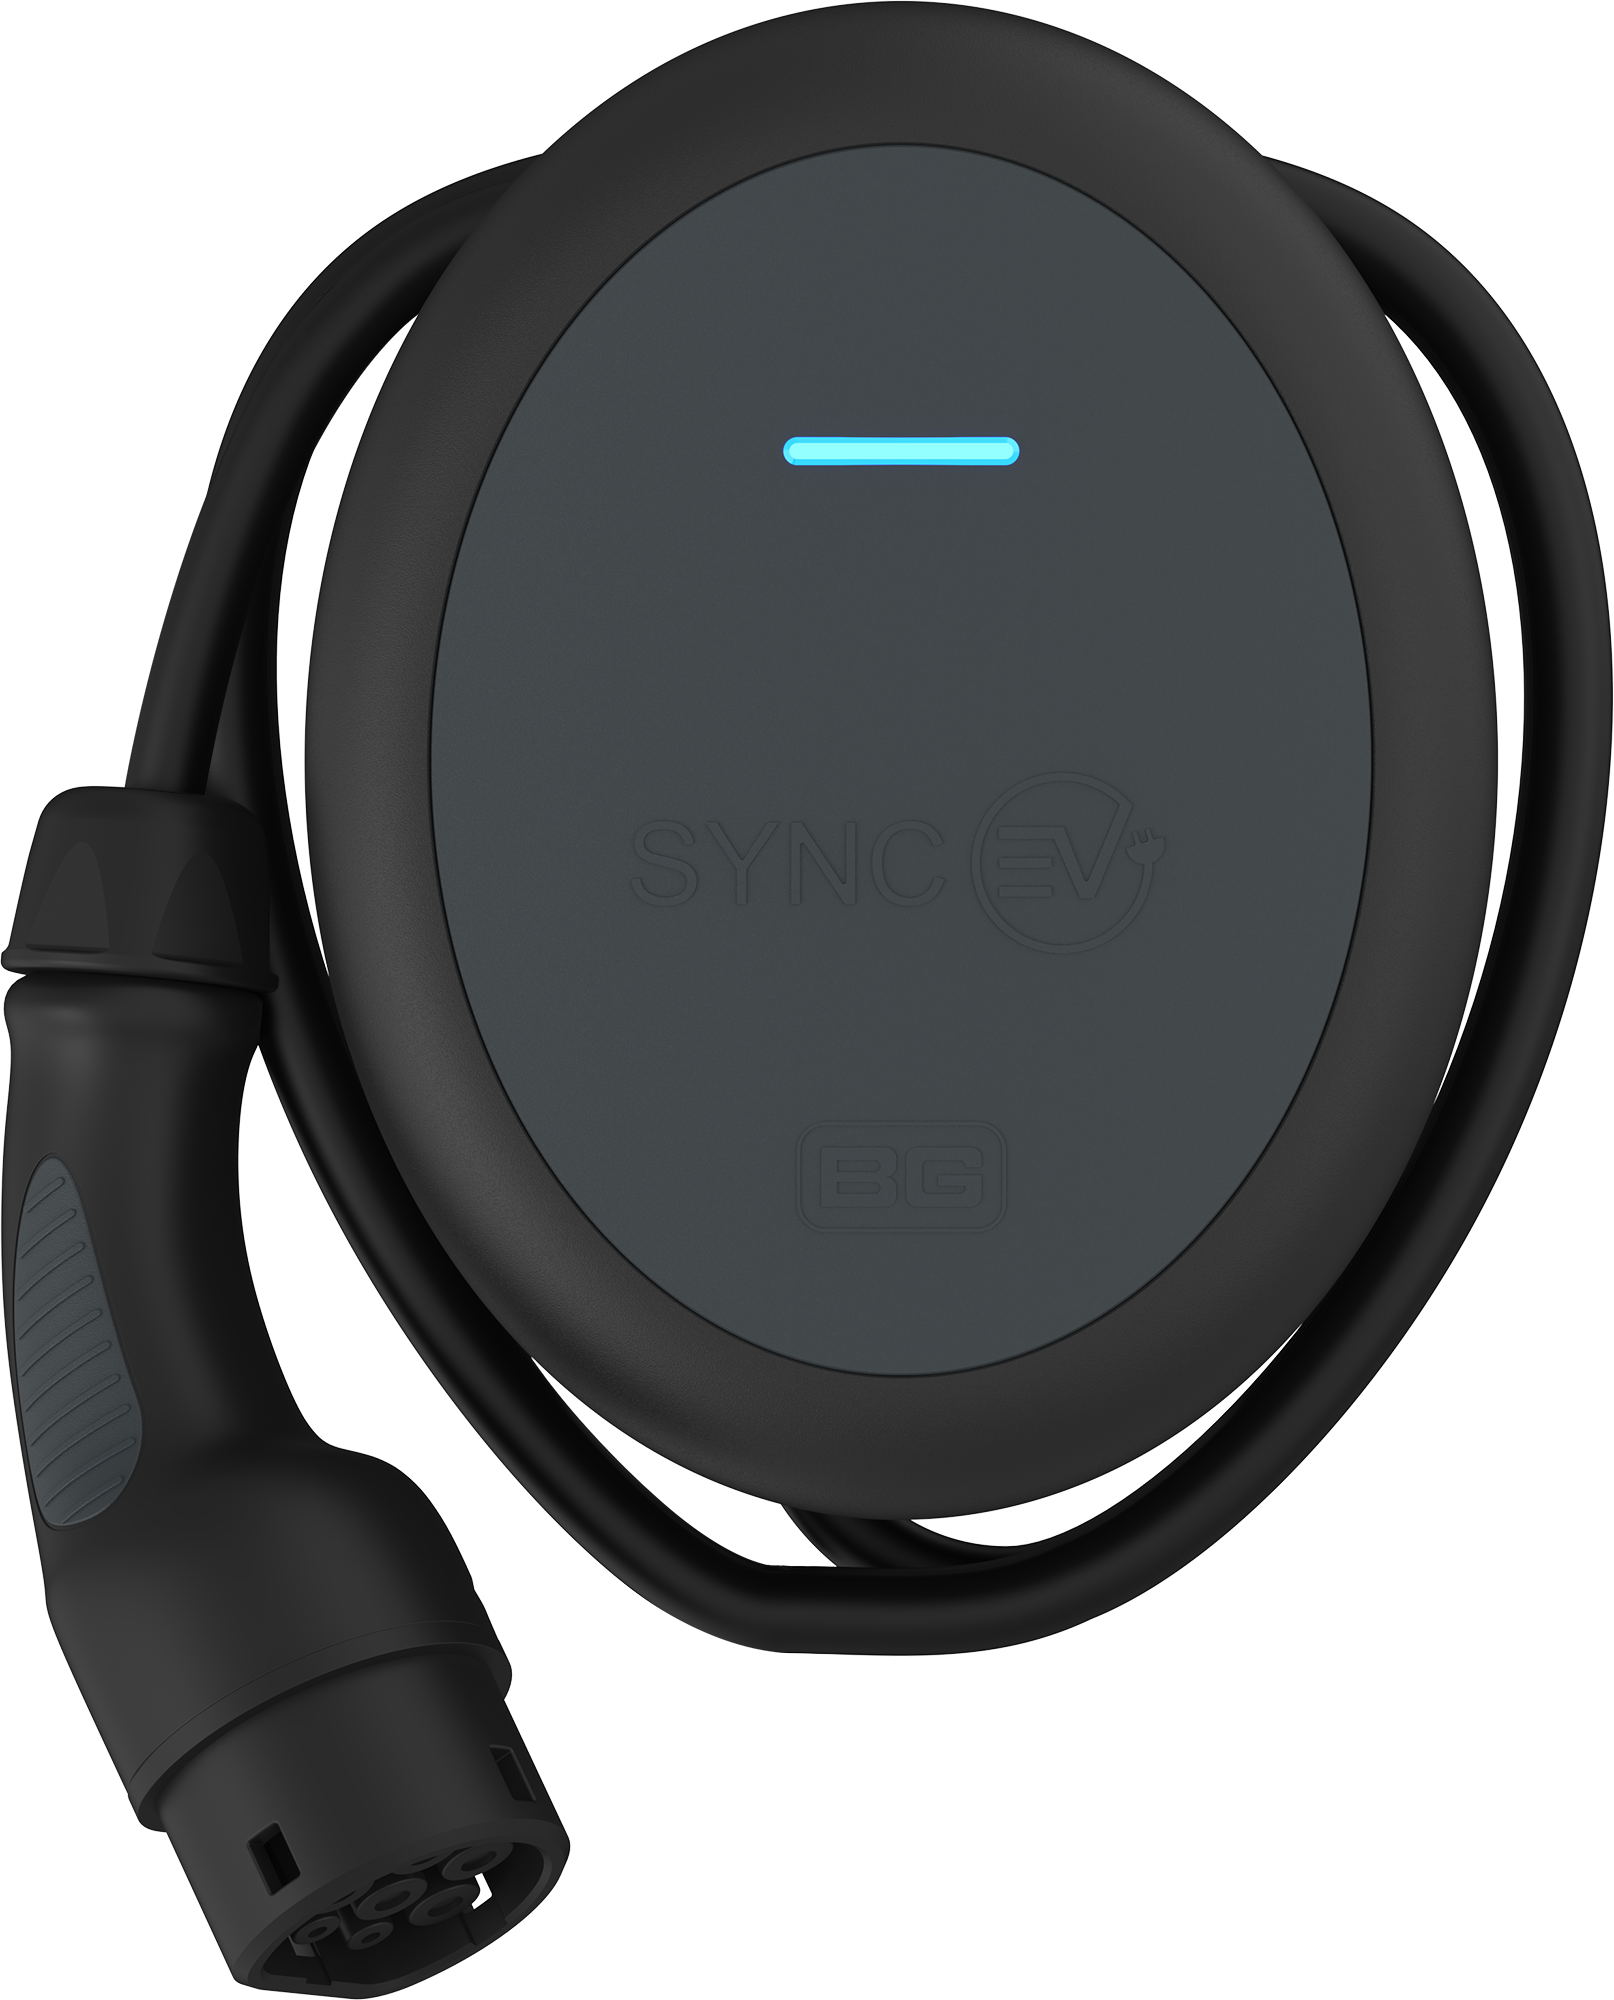
Tethered EVTxx

Socketed EVWC2Sxx

Tethered EVWC2Txx


For legacy chargers with model numbers EVCP-7KW-S-1PH and EVCP-7KW-T2-1PH please contact our Technical Support team on (01952) 238 128 or (03300) 249 279. Our lines are open 8:30-1700 (Monday-Thursday), and 08:30-16:00 (Friday).
Alternatively, visit our Troubleshooting guides for self-help information.
Dynamic Load Management protects the main fuse of a property from overload by monitoring the total load being drawn by the property and adjusting the EV charger output accordingly.
For example:
- Main house fuse = 60 amps
- EV charger max power = 32 amps
- Power shower = 40 amp
If the EV was charging and somebody decided to have a shower this could blow the main house fuse - 32 + 40 = 72 amps (fuse exceeded by 12 amps). In this case the load management device will tell the charger to reduce its charge rate to <20 amps until the shower is turned off, thus protecting the main fuse.
This feature is only available as an option with the installation of a separate CT Clamp which is designed for installation inside the main consumer unit or around the tails from the main fuse.
Our CT clamp/Dynamic Load Management Kit part numbers are:
- EVA120CT1 (for EVS and EVT models)
- SYNC-LMK (for EVCP models)
Click here to view our range of accessories
Self-installation of EV chargers at home or workplace is not possible for safety and legislative reasons. We recommend approaching our network of qualified OZEV approved electricians for a quotation. This will allow you to purchase a SyncEV BG Charger and have it safety installed at your home or place of work.
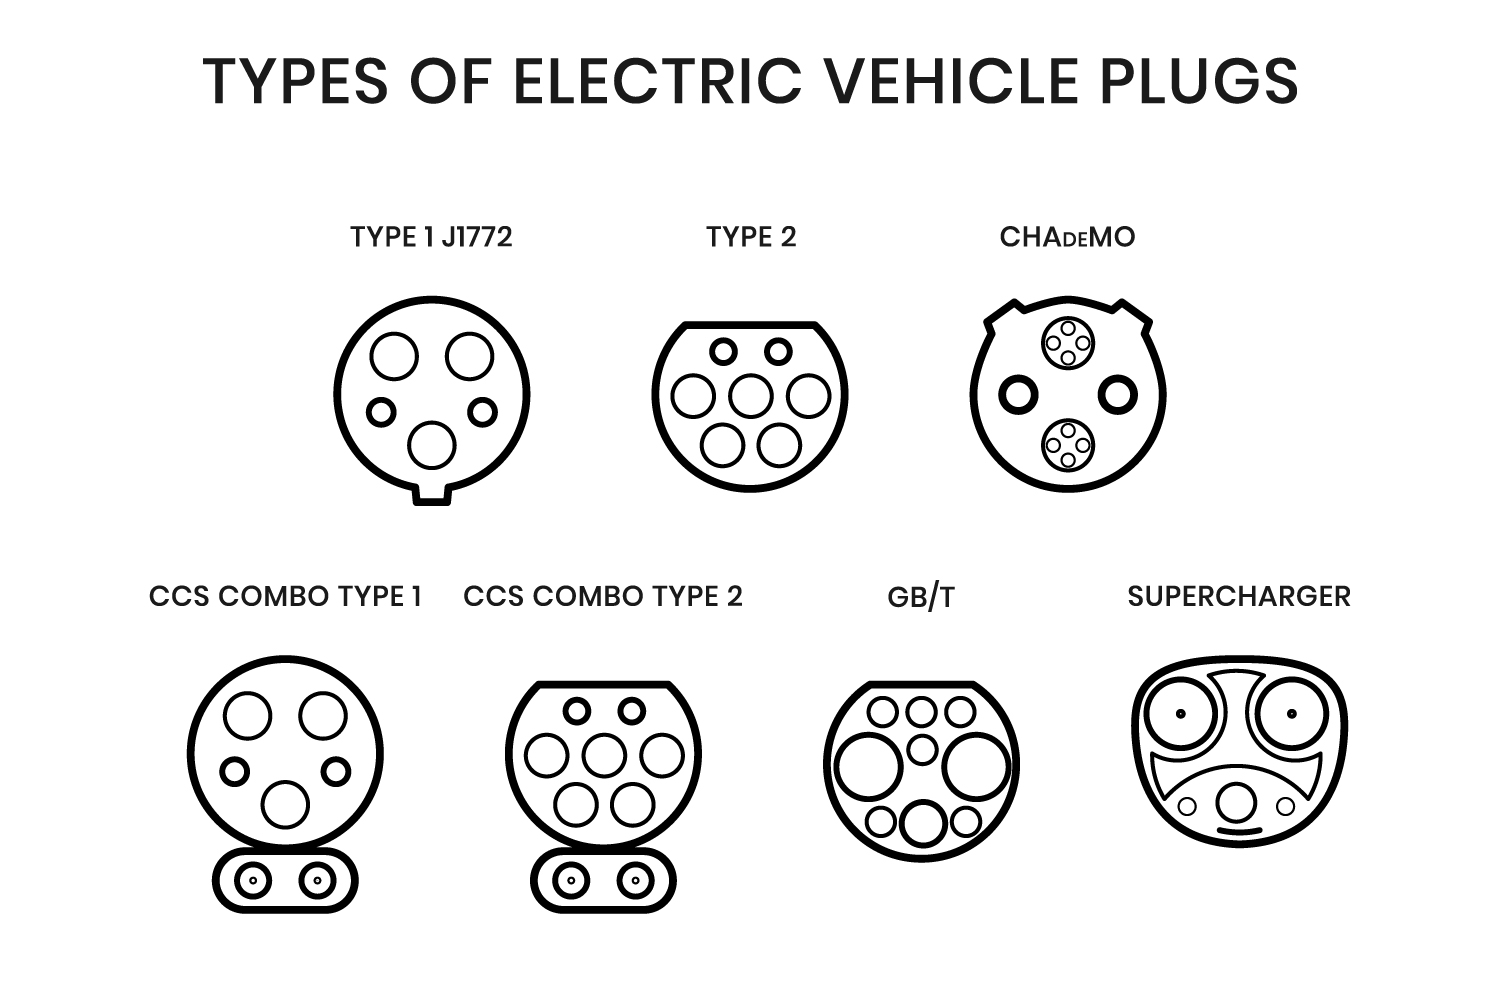
Type 1 plugs are single-phase and allow for fast charging at a power output level of 3.7kW-7.4kW AC. The design features 5-pins and is mostly used with car models found in parts of Asia and the US, less so in Europe. It may be difficult to find Type 1 chargers and charging stations in the UK.

Type 2 plugs feature a 7-pin design that is the standard for the European market. It offers fast charging capability with a power output level of 3.7kW-7kW AC. Exceptions to this include Tesla Superchargers - they provide DC voltage over Type 2 connectors with an output of >130kW, and 3-phase home/workplace chargers that charge at up to 22kW AC.
Type 2 connectors have an inbuilt locking mechanism that ensures you can safely and reliably use them at charging stations without worry of disconnection by other users.

Tethered – the cable is permanently attached to the wall charger. Advantages of this option included practicality, as you don’t have to go through the hassle of using the cable in the boot of your car every time you need to charge. Simply uncoil from the wall box and plug in to your EV. Another benefit is security, as the cable cannot be removed or stolen from the charging station.
Untethered (or socketed / socket only) – The charge cable is not permanently attached, there is a Type 2 socket fitted to the charging station. This gives you the flexibility to use any cable/connector type, and any length of cable. Untethered chargers could be seen as more inconvenient due to the need to use your own cable (often stored in the boot of your car) and plug in both ends before charging can begin. The reverse process applies before setting off. However, without a cable, untethered units look tidier on your driveway.
It may seem obvious, but the charger should be sited where you park your EV, this could be a private driveway to the side or front of your property, or garage. When positioning think about where the cable plugs in to your car (is it at the front, side, at the back?) and how you intended to park your car – do you prefer to reverse or drive in-to your driveway?
Lastly, think about where the cable will lay when connected to your car. Ideally the cable shouldn’t present a trip hazard, or block gates/access.
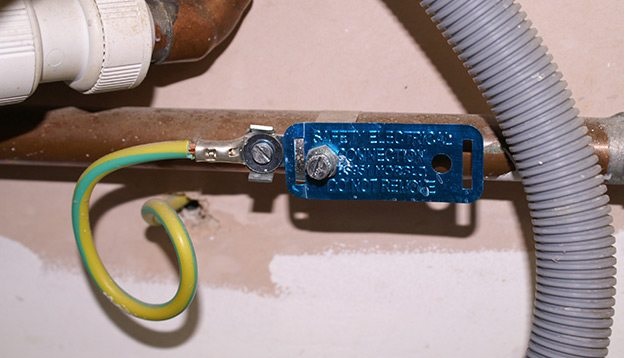
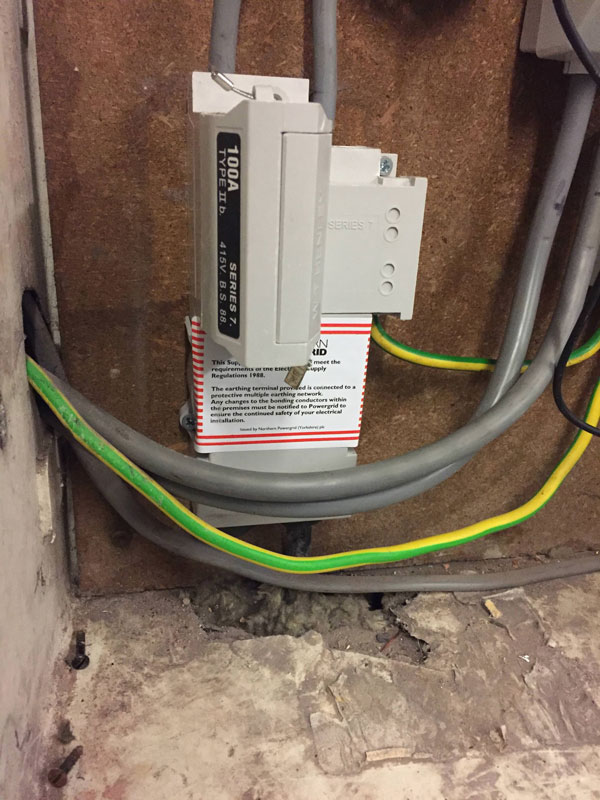
When installing a new EV charging point our installers will need to complete a few safety checks, one of these is checking for earth/main bonding. These connections are made to prevent a dangerous voltage between two accessible metal parts, in case there is a fault.
An easy way for you to check if your gas and water supplies are bonded is to check the supply meter box for gas, and your incoming mains water supply near the stop-cock.
You are looking for green/yellow wires connected to the main gas and water pipes using an earthing/bonding clamp.
The MPAN (Meter Point Administration Number) is a unique 21 digit reference number used in the UK that identifies each electricity supply point.
Your MPAN will be listed on your electricity bill. It may be called a Supply number. They're often printed at the bottom of the first page of your bill or on the reverse of the first page.
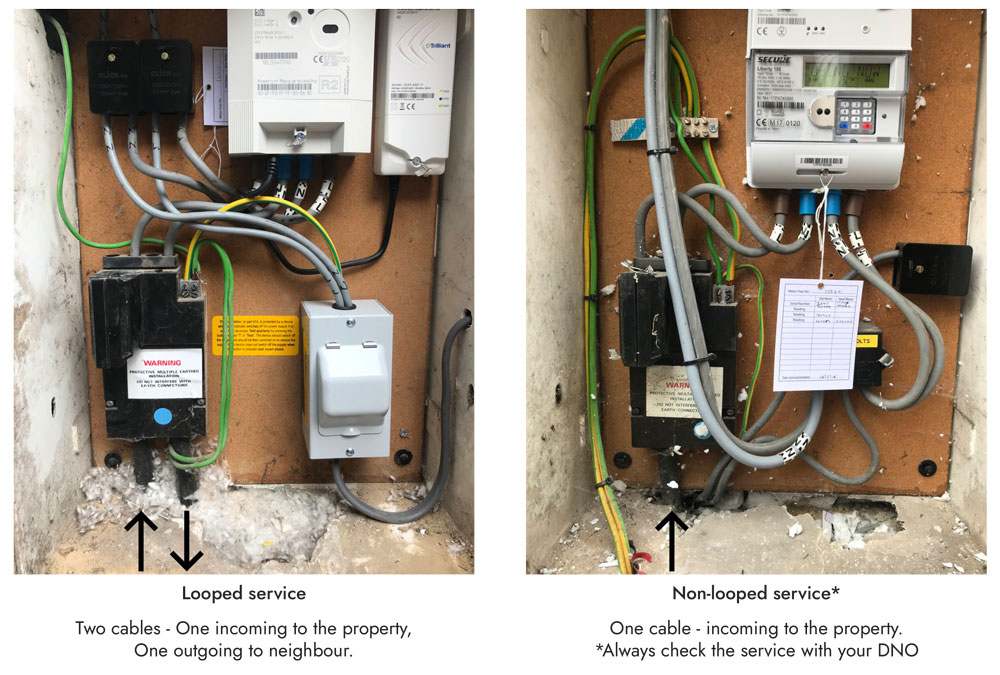
A looped service means that your property is sharing the main power supply cable with another property (normally your neighbour). In some circumstances this could mean that your main fuse is not suitable for an EV charger or cannot be upgraded.
Typically, if you have one cable running to your main fuse then you do not have a looped service. If you have two cables this would indicate a looped service.
This is located in the electricity meter box on your property.
For clarification please ask your power distribution network operator (DNO), they will be able to tell from your records.
The main fuse (cut-out fuse) is located in the electricity meter box on your property. This is normally on the outside wall or under-stairs. Check for labelling on the top or side of the fuse, you are looking for the Amperage (A) – this is normally 100A or 60A.
If you are still unsure of the main fuse size, please send us photos and we will confirm for you.
Depending on advice offered by the DNO (power distribution network operator) of the property, we can offer the installation of an optional CT clamp. The CT clamp, in conjunction with our in-built load management system, protects the main fuse from overload by monitoring the total load being drawn by the property and adjusting the EV charger output accordingly.
A Current Transducer (CT) Clamp is a safety feature, it will monitor the total load (amps) going through the home. If the clamp detects that the load is close to exceeding the maximum the house is able to handle, then the EV charger rate will be reduced. Ultimately this will prevent the house fuse from being blown.
Yes, you can plug an electric vehicle into a regular outlet/socket using a Mode 2 charger (find out more about Charging Modes here), but you will only be able to charge at the rate of up to 2.3kWh. This low rate of charging could take over 26 hours to fully charge from empty based on a typical 60kWh battery BEV (Battery Electric Vehicle).
Smart EV chargers in their simplest form are chargers which are connected to the internet. The main purpose of this connection is to ensure that the device can be updated with firmware, especially as new software and technologies are released into the market. However, being smart also factors in the ability to utilise renewable energy sources and the ability to integrate with times of use and economy tariffs, and also balance power demand with the property and main electricity grid. SyncEV BG are Smart chargers, and feature OCPP (Open Charge Point Protocol) – the global standard for EV charger communication.
- The OZEV EVHS grant (for homeowners) ends on the 31st of March 2022 and cannot be claimed for installs completed after that date. If you live in a flat, or you rent your property there
- Before 31st March 2022 EV charger grants have to be claimed on the customers behalf by an OZEV approved installer, whereby the grant is deducted from the quoted price to supply and install.
The government’s electric car grant is paid out by the Department for Transport’s Office for Zero Emission Vehicles (OZEV), and is designed to make the transition to electric car/vehicle (EV) ownership more affordable for more drivers.
This scheme is available for the purchase of new EV’s from dealerships and manufacturers. If you buy an eligible vehicle you do not need to do anything – the dealer will include the value of the grant in the vehicle’s price.
Visit https://www.gov.uk/government/publications/electric-vehicle-homecharge-scheme-eligible-vehicles for more information on the cars available, or here for up to date information on the grant scheme https://www.gov.uk/plug-in-car-van-grants
Our chargers are safer and faster than charging from a standard electrical outlet. You can also smart charge, allowing use of cheaper energy tariffs.
SyncEV BG socketed chargers work with all fully electric and plug-in hybrid EV’s (compatible charging lead required for your vehicle). Our tethered chargers are only compatible with vehicles that have a Type 2 socket. All chargers are designed to work specifically with the UK power network.
You can charge your car at any public parking spot that has a charging station, this can include on-street parking, shopping centres, restaurants, hotels, or hospitals. Public charging requires specific charge cards (often called RFID cards).
Or, charge at home in a private garage / driveway, or at a designated parking spot/shared parking facility (common for apartments). Many places of work now offer charging facilities to employees, often billed via roaming charge cards or in-house schemes.
Whether you have access to all public charging stations depends whether your charge card allows roaming. Roaming allows charging stations from different providers to communicate and exchange data with each other. If “roaming” is activated, you have access to charging stations from multiple providers. To access this feature, you'll need to purchase a charge card or charging subscription with "interoperability" or "roaming".
An increasing number of charge points now accept contactless credit or debit card payments, negating the need for specific charge cards.
The average electricity fee is approx. 29p per kWh* in the UK (consumer rate, as of February 2024). If your electric car has an empty battery and approximately 60kW capacity, charging your electric car would cost a total of 60kWh x 0.21 = £17.40.
*energyguide.org.uk/average-cost-electricity-kwh-uk/
This really depends on the type of charging station, your car model, driving style, as well as traffic speed and road conditions. As a guide, to fully charge a 60kW electric vehicle using a SyncEV BG wall charger would take approx. 8 hours.
Commercial rapid chargers will replenish the battery significantly quicker, in around 40-60 minutes.
- There are many factors that'll have an impact on your power consumption and time to charge. You can extend the range of your electric vehicle by adopting eco driving techniques and working with your vehicle’s features. We recommend that you:
- Anticipate the road ahead to avoid harsh acceleration and braking.
- Watch your speed.
- Consider how you use the heating and air conditioning, (for example, pre-heat the car while plugged-in to avoid consuming energy from the battery at the beginning of the journey).
- Understand and using your vehicle’s eco-mode or features, such as regenerative braking.
Yes, if the charging station is compatible with your charging cable and able to read your charge card.
Just like regular electricity outlets, charging stations may have different outlets and connectors depending on the country where you're charging and your cars origin.
To simplify things car manufacturers have now standardised two types of outlets and connectors.
From the car side, a Type 1 socket is common for Japanese and American vehicles, and a Type 2 socket is the European standard.
From the charging station side, most domestic chargers are equipped with a Type 2 socket. Commercial rapid chargers have a variety of connectors, including Type 2, CHAdeMO and CCS (Combined Charging System).
Our in-built load management system protects the main fuse from overload by monitoring the total load being drawn by the property and adjusting the EV charger output accordingly. The load management feature is only available as an option with the installation of a separate CT Clamp.
Yes, most UK properties run off a power supply (called single-phase) which easily supports 7kW chargers.
To benefit from 7kW charging the first thing to check is the size of your property’s main fuse.
It is preferable to have a 100A incoming supply fuse into the property to allow the maximum output of a 7kW charger, however, the electrical demand of the property needs to be calculated and confirmed to make sure this is suitable.
If you have less than a 100A main fuse then we are still able to install a charger, however, depending on what the demand on the property is, you may need to have the fuse upgraded by the local DNO (power Distribution Network Operator)
You can find your main fuse linked to your electricity supply meter. There should be a label on the side of the fuse showing the amp rating. If you are unable to find it, please call your electricity provider to clarify your fuse rating.
A 22kW charger is 3 times faster than a 7kW charger but requires a three-phase electrical setup. Most UK residential properties run on single-phase electricity so cannot have a 22kW charger installed. Single phase supports a maximum of 7kW EV charging.
Also, it’s worth checking that your EV can support 22kW AC charging. Many vehicles only support higher charge rates when using Commercial DC rapid chargers.
With Monta App and Integrated SolarCharge you can easily use surplus energy from you solar panels to charge your electric vehicle.
For 7kW charger installations:
- 1 x 6mm 3 core armoured cable up to 30m,
1 x 10mm 3 core armoured cable over 30m
For 22kW charger installations:
- 1 x 6mm 5 core armoured cable up to 30m,
1 x 10mm 5 core armoured cable over 30m
These modes indicate the type of charger being used and its power output:
- Mode 2 (AC single phase supply) – 2.3kW max from a domestic 3-pin socket using a cable with an inbuilt protection device and power control that emulates basic Mode 3 charger signals
- Mode 3 (AC single phase supply) – 7.4kW – a typical dedicated home charging point, tethered or untethered with smart control and protection
- Mode 3 (AC three phase supply) – up-to 22kW – Limited to 3 Phase power supplies only (charging at work, or commercial premises), tethered or untethered with smart control and protection
- Mode 4 (DC current) – 22kW-100kW+ - Typically rapid and super-rapid destination chargers, found at motorway services, supermarkets, shopping malls
The Open Charge Point Protocol (OCCP) is a global communication standard for EV chargers and the networks that they run on.
OCCP offers:
- Flexibility - With some EV charging stations, the hardware only works with its own brand of software. That means you're locked in to paying their networking fees in order to keep your charger online. When you choose an OCPP-compliant charging solution, you can change your network whenever you want.
- Security - If you purchase non-OCPP charging station and the manufacturer goes out of business your charger will stop working. With OCPP interoperability, you never have to worry about these kinds of stranded assets.
- Competitiveness – You’re in control to choose the software that’s right for you, meaning service providers actively develop their software to the become the most feature-rich, user-friendly and up-to-date solutions.
No – our charging systems are specially designed to completely disconnect the charging point from the car if a fault develops, therefore an earth rod (which is expensive and time consuming to install) is not required.
Yes, our Type 2 connectors have a pin locking system to prevent unwanted disconnection
Our chargers update over the air as new firmware is released. Simple to start via the Monta or Ev.Energy apps.
You will be notified when updates and the new features we have been working on are available.
We use tried and tested UV stabilised polycarbonate to help protect the colour and stability of our chargers. Chargers are also IP and IK rated to protect against
You can make money from your BG Sync EV Charger using our Monta app– Make your charger public so other users can see it and pay to use your charger.
A commercial charge point is defined as where a charge point is installed at a location that needs to facilitate multi-user functionality and is supported with an “OCPP Back-Office” (software platform) to allow the charge point owner to set, monitor and control charging rules for its users.
In any instance where the charge point owner wishes to extend the use of the charge point to persons outside of themselves, across a single or multiple sites, a commercial back-office is required. This will allow the charge point owner to effectively monitor all usage, and tailor their charge point “rules” to meet their specific requirements, offering complete control to the charge point owner as to who has access on a how, where and when basis.
BG Sync have chosen to partner with Monta to assist charge point owners with meeting their commercial needs.
Yes. Monta does have a monthly subscription cost to allow you to access all of its premium commercial features, which is offered at a discounted rate through BG Sync.
A £5.00 Per Charge Point Per Calendar Month Subscription is applied to all charge points, applied directly on the first day of each calendar month.
Monta offers a number of different functionalities to completely customize control charge point operation and its user experience, more information on this can be found here - Monta Hub.
Monta allows the charge point owner to set up their charge point(s) on a “PAYG” basis, offering the charge point owner the ability to set single or multiple tariffs, alongside additional charging fees, such as minute fees and overstay fees, to both single users and/or user groups and on either Private (Team Members only) or Public (Everyone) basis.
On top of this, “member fees” can be applied to any single and/or user groups, effectively creating a subscription-type agreement between the charge point owner and user for access to the charge point.
Using the schedules functionality, tariff pricing also has the flexibility to allow for different pricing and associated additional fees on the tariffs to be applicable during different periods of the day/week as per the charge point owners' requirements.
For all “PAYG” sessions, payments for charging are made directly through the Monta smart app for Team Members via their Personal Wallet. In most instances, this will be made through a credit/debit card linked to their account by themselves, in which the transaction will be processed prior to charging commencing after they have agreed the charging value, or via any pre-loaded balance they have added to their Personal Wallet.
No, in some instances. If you wish to minimise user administration as the charge point owner for visitors on Public charge points, you may wish to set up the charge points on a QR barcode system, also known as Instant Charge.
This allows any potential users on a public basis to simply scan a paired QR barcode using the camera on their smart device, opening an instanced payment gateway.
Any Team Members needing access to a specific member tariff, will unfortunately still need to use the Monta app to access these
Unfortunately, we do not currently offer a contactless payment method. RFID/Charge Keys provided by Monta/BG Sync are simple means to authorise a charging session on any charge point with limited private accessibility, that has no paid tariff attached to its users.
Yes. Monta allows for this functionality through its Sponsored Charging. This allows the charge point owner to receive real time reports of the electricity cost used on the charge point, and directly re-imburse the user through the Monta platform, at either selected periods or in real-time.
Monta has integrated with a number of fleet management businesses, such as Mina, to make EV charging payments for employees even easier.
Yes. Monta does allow you to display your charge points on other charging point apps, such as Zap-Map, but please note, there are additional fees applicable for this.
These can be found, here - Monta Roaming Network
No. Monta offers an unlimited volume of Charge Points, Charging Sites, Members, Tariffs and all other functionalities on your platform, ensuring all information and data are stored and accessible at one localised central point.
What You'll Need:
- Wifi Network Name (SSID) and Password
- Smartphone with Bluetooth
Steps:
1. Offline Charging:
- Your charger can still work without internet. Just plug in your car! (Yellow light)
2. Download the Apps
- Download the "BG EV Charging App" (for setup only).
- Download the "ev.energy App" (for smart charging).
3. Connect to Your Charger (Setup App):
- Enable Bluetooth on your phone.
- Open the BG EV Charging App.
- Select your charger's serial number (found in the welcome pack manual).
- Enter the default password: 12345678 (Change it later!).
4. Connect Your Charger to Wifi (Setup App):
- In the app, choose your Wifi network (SSID).
- Enter your Wifi password.
- Tap "Set".
5. Set Up Smart Charging (ev.energy App):
- Open the ev.energy app and create an account.
- Add your vehicle, charger, address, and energy plan details.
- Follow the app's instructions to connect to your car.
- Turn on "Smart Charging" and set your desired charging time.
6. Enjoy Smart Charging! (Blue light)
- Your charger will reboot and show a blue light when connected.
- You can now use the ev.energy app to manage your charging.
Yellow Offline charging. This will charge the vehicle once plugged in. The light will turn green whilst charging
Blue Online/Plug and charge mode. The charger is connected to the internet or the charger is in plug and charge mode and will work with our app supplier, ev.energy
Flashing Blue Preparing. When the car is plugged in this indicates the vehicle has registered with the charger. If there is a timer set in the vehicle this state will continue until the scheduled time
Blank No power to the unit. Check the consumer unit supplying the charger. Ensure the circuit breaker marked “EV Charger” (or similar) is switched on
Flashing Red Faulted state, possible Over/Undervoltage, Anti Tamper protection active. Contact Technical Support Helpline
Solid Red – Firmware update pending
Included in your Welcome pack.
When you stand by the charger, does the router appear on your phone when you are searching for Wi-Fi?
If not you may need a Wi-Fi extender closer to the charger. Smart products like the BG SyncEV charger work on the 2.4GHz network so won’t show 5GHz networks.
If your router is dual band (see the back of the router) you may need to change some settings to make the 2.4GHz network visible, either by temporarily switching off the 5GHz network until your charger has connected or by creating different network names for the 2.4GHz and 5GHz networks – consult the user guide for your router or speak with your network provider to find out how to do this.
Reboot the charger by turning the circuit off and on again – if left powered on for a long period of time this will turn off for security reasons. Refresh the app by dragging down the screen. It may take a minute or 2 for the unit to display once powered up
This indicates preparing mode and will continue to do so until either the charging start time specified in the app or in the vehicle has been reached. We recommend only using one timer to avoid conflict
In the parameters page check the Server URL is ‘Home Charge’ the CP Name is the serial number of the charger, Authorization Key is 12345678 and Charger Mode is APP mode
This guide explains Monta SolarCharge, a system that lets you charge your electric vehicle (EV) using solar power. There are two options:
-
Virtual SolarCharge: This uses the energy produced by your solar panels to charge your car. To set this up, you'll need to know the following about your solar panels:
-
Combined peak output
-
Declination
-
Azimuth
You can enter this information into the Monta app.
-
Integrated SolarCharge: This uses a CT clamp installed on your home fuse box to measure the energy coming from your home electricity grid.
Once you've set up SolarCharge, you can start a charging session. However, keep in mind that SolarCharge is only available with a Charge Now session.
This guide offers steps to troubleshoot common issues with Monta Home Charging:
General Troubleshooting:
-
Check Charge Point Logs: Always begin by checking the logs of your charge point in the Monta Charge app. This will reveal if the problem is with your car, the charge point itself, or the Monta app.
SmartCharge Troubleshooting:
-
Verify SmartCharge Preferences: Ensure your SmartCharge preferences are set correctly within the app.
-
Examine Charging Hardware: Confirm that your charging cable, charge point, and car aren't limiting the charging speed.
Car Pausing Charge:
-
Review Car Settings: If your car paused charging, check its EV charging settings to see if any active settings are controlling the charge and disable them as needed. Monta cannot override a car's command to stop charging.
kWh Registration Issues:
-
Verify Connection and App: Double-check that your charge point is connected to Monta and that you're viewing the correct charge point in the app.
-
Examine Native Configuration: Look at your charge point's native configuration tool to ensure it requires authentication to start charging and that free vending mode is disabled.
If you're still having trouble after following these steps, Monta's Help Center provides additional resources or you can contact Monta Support for further assistance.
This guide explains how to set up cost tracking for your EV charging sessions with Monta.
Benefits:
-
Track the electricity cost of charging your car.
-
Identify optimal charging times based on electricity prices (if applicable).
Requirements:
-
Monta Charge app
Steps:
-
Access Charge Point Settings: Open the Monta Charge app and navigate to your charge point's settings.
-
Locate Cost Tracking: Look for the option titled "Electricity cost" or "Cost tracking" within the settings menu.
-
Set Up Cost: Choose between "Spot" or "Fixed" cost per kWh depending on your electricity plan.
-
Specify Location: Select your Distribution System Operator (DSO) based on your location. This helps determine the relevant electricity rates.
-
Optional Fees: You can add additional charging fees in the "Advanced settings" section (if applicable).
-
Confirm and Save: Review your selections and confirm the electricity cost. Save the changes.
Additional Notes:
-
This feature allows you to track costs but doesn't necessarily control charging based on cost (consider using SmartCharge for that).
-
Monta Help Center may offer further resources on cost tracking functionalities.
This guide explains how to manage your participation in Monta's PowerBank program through the Monta Charge app.
What is PowerBank?
PowerBank helps stabilize the electricity grid by allowing Monta to briefly pause and resume your EV charging sessions during peak demand times.
Benefits:
-
Contribute to grid stability and potentially prevent blackouts.
-
Earn Monta credits for each kWh charged while participating.
How to Sign Up:
-
Locate Charge Point: Open the Monta Charge app and find your charge point.
-
Access Settings: Click on the settings icon for your charge point.
-
Find PowerBank Tab: Look for a tab labeled "PowerBank" or similar.
-
Review and Accept Terms: Carefully read and agree to the PowerBank Terms & Conditions.
-
Join PowerBank: Click on the button to join the program.
How to View Earned Credits:
-
Follow Steps 1 & 2: Locate your charge point and access its settings in the app.
-
Open PowerBank Tab: Click on the "PowerBank" tab again.
-
View Credits: Scroll down to see the number of Monta credits you've earned by charging while participating.
Additional Notes:
-
You can earn up to 5 EUR per month per charge point (subject to change).
-
Participating in PowerBank won't significantly impact your charging experience.
-
Monta will automatically manage charging pauses and restarts.
This guide explains how to initiate charging for your electric vehicle (EV) at home using the Monta Charge app.
Two Charging Methods:
-
Charge Now: This is a straightforward method to begin charging immediately.
-
Auto Start: This option allows for automatic charging initiation when you plug in your car.
How to Use Charge Now:
-
Open Charge Point: Locate your home charge point within the Monta Charge app.
-
Select Charge Now: Choose the "Charge Now" tab.
-
Optional Steps:
-
Select your car (helps optimize charging).
-
Choose a desired charging timeframe (optional).
-
Start Charging: Swipe the button to confirm and initiate charging.
How to Use Auto Start (Optional):
-
Access Charge Point Settings: Open the app and navigate to your charge point's settings.
-
Security and Access: Find the "Access Settings" section and choose "Private".
-
Enable Auto Start: Toggle on the "Enable Auto Start" option.
-
Save Changes: Click "Save changes" to confirm.
Additional Notes:
-
Your car can still stop charging if it reaches its set battery limit.
-
Refer to the Monta Help Center for further information on managing charging sessions or troubleshooting issues.
What is SmartCharge?
SmartCharge allows you to schedule charging sessions based on your preferences for:
-
Electricity Cost: Charge when electricity is cheapest (may require dynamic tariffs).
-
Renewable Energy: Prioritize charging during times with high renewable energy use.
-
CO2 Emissions: Reduce your carbon footprint by charging when there's lower CO2 output.
How to Set Up SmartCharge:
-
Enable SmartCharge on the Charge Point:
-
Open the Monta app and navigate to your charge point settings.
-
Select "Access settings" and choose "Private."
-
Enable "Enable SmartCharge" and save the changes.
-
Set Up Electricity Costs:
-
In the app's charge point settings, select "Electricity cost."
-
Choose between "Spot" or "Fixed" cost per kWh.
-
Select your Distribution System Operator (DSO) based on your location.
-
You can add additional fees in "Advanced settings" (optional).
-
Confirm your electricity cost and save.
How to Perform a SmartCharge:
-
Open the Charge Point in the App:
-
Locate your charge point in the Monta app.
-
Select the SmartCharge Tab:
-
Choose the "SmartCharge" option.
-
Set Up Your SmartCharge Preferences (Optional):
-
Select the car you're charging (helps optimize based on battery size).
-
Choose your desired timeframe for the car to be fully charged.
-
Adjust Your SmartCharge Balance:
-
A slider allows you to prioritize between low cost, reduced CO2 emissions, or renewable energy use.
-
Start the SmartCharge Session:
-
Slide the button to confirm and initiate the SmartCharge.
-
The charging will begin according to Monta's algorithm, even if you plug your car in earlier.
Additional Notes:
-
You can set up Auto SmartCharge for automatic charging based on your preferences.
-
Your car can always stop charging if it reaches its set battery limit.
This guide walks you through connecting your charge point to the Monta network using the Monta Charge app.
Requirements:
-
Monta Charge app
-
Your charge point's user manual (may be needed)
Two Connection Methods:
-
Adding a Charge Point to Your Team: Useful if you want to share your charger with others (family, friends, neighbors).
-
Connecting via Cloud Integration: For situations where your charge point has its own cloud-based platform.
Connecting via Team (For Sharing):
-
Open the App: Launch the Monta Charge app.
-
Add Charge Point: Click the "+" icon and select "Add one charge point".
-
Fill in Details:
-
Choose your charge point brand and model from the list.
-
Select a "Site" (where the charger is located) if applicable.
-
Give your charge point a recognizable name.
-
Specify the address (optional, but helpful for public visibility).
-
Connect Now: Click on "Connect now" to proceed.
-
Optional: QR Code Scan: If your charge point has a QR code, scan it with your phone's camera to simplify pairing.
-
Finalize Connection: Follow any additional instructions displayed on the app or consult your charge point's manual if needed.
Connecting via Cloud Integration:
-
Open the App: Launch the Monta Charge app.
-
Connect Now: Click on "Connect now" for your charge point.
-
Cloud Integration: Select the "Cloud integration" option.
-
Login Credentials: Enter your login details for your charge point's cloud platform.
-
Pair Confirmation: Select the correct charge point from the list displayed.
-
Finalize Connection: Click "Yes, pair charge point" to confirm the pairing.
Additional Notes:
-
The specific steps may vary slightly depending on your charge point model.
-
The Monta Help Center offers additional resources for troubleshooting connection issues or specific charge point models.
This guide helps you troubleshoot a situation where your Monta charge point is disconnected from the Monta network.
Before You Begin:
-
Ensure your smartphone has a stable internet connection.
-
Check the Monta status page (https://status.monta.app/) to rule out any widespread network issues.
Steps to Take:
-
Verify Power: Confirm that your charge point is properly plugged in and receiving power.
-
Restart the App: Close the Monta Charge app completely and relaunch it. This can sometimes resolve minor glitches.
-
Reconnect via Wi-Fi: If you're using Wi-Fi for your connection, try restarting your Wi-Fi router and waiting for it to fully reboot before re-opening the app.
-
Check Charge Point Connection:
-
Go to your charge point's settings (consult the user manual if needed).
-
Verify that it's still connected to your home Wi-Fi network or Bluetooth (depending on the model).
-
Re-establish Connection:
-
Follow the steps in the Monta Help Center guide "Connect your charge point" (refer to the previous guide you created) to attempt reconnection.
Still Disconnected?
If none of these steps resolve the issue, the Monta Help Center offers additional resources or you can contact Monta Support for further assistance. They may need more information about your specific charge point model and any error messages you're encountering.
What are Teams?
Monta Teams let you share your charging station with others and set custom charging prices for them.
How to Create a Team:
-
Go to the Teams tab: In the Monta app, find the "Chargers" section and then select the "Teams" tab.
-
Click the "+" icon and choose "Create a Team."
-
Fill in the Team details: Give your team a name, email address, and location.
-
Set a default price: This is how much Team members will pay per kWh to charge. You can add more prices later.
-
Choose approval method (optional): Decide if Team members are automatically approved or need your permission to join.
-
Finalize the Team: Click "Done, create Team!"
Company Teams (Optional):
If your Team is for a company, follow steps 1-3 above, then:
-
Toggle on "This is for a company" and click "Next."
-
Provide your company's address and financial information.
Additional Notes:
-
You can create multiple Teams for different groups of people.
-
The guide mentioned you can add more prices later, but it didn't cover how to do that. You can likely find those details elsewhere in the Monta app or Help Center.
This guide assumes you've already created a Team using the Monta app.
Key Actions:
-
Invite Members: Add new members to your Team by entering their email address or phone number in the app.
-
Approve/Deny Requests (Optional): If you haven't enabled automatic approval, you can review and approve/deny membership requests from people who want to join your Team.
-
Edit Team Details: Change your Team's name, email address, or location through the app's settings.
-
Set Custom Prices: You can create different charging prices for various member groups within your Team (details on how to do this might be found elsewhere in the app or Help Center).
-
Remove Members: If needed, you can remove members from your Team through the app's management options.
Additional Information:
-
The specific steps for managing Teams might vary slightly depending on the Monta app version.
-
Consider checking the Monta Help Center for the latest information on Team management functionalities.
This guide explains how to invite and manage members within your Monta Team.
Prerequisites:
-
You already have a Monta Team created (refer to the previous guide on creating a Team).
-
You have the Monta Charge app installed.
Adding Team Members:
-
Invite by Email/Phone: Open the Team in the app and select "Team members." Click "+" and choose "Invite member." Enter the email or phone number of the person you want to invite and click "Send invitation."
-
Share Join Code: Alternatively, you can share the Team's unique join code with others. They can enter this code in the Monta app to join your Team.
Managing Invitations:
-
Invited users will appear under "Invited" until they accept the invitation.
Managing Members:
-
Once a member joins, you can view their details within the Team member list.
-
You may be able to set different charging prices for specific members (refer to the Monta app or Help Center for details on how to do this).
Removing Members:
-
If needed, you can remove members from your Team through the app's management options (specific steps might vary).
Additional Notes:
-
The Monta Help Center may offer more information on Team member management functionalities.
This guide explains how to move a charge point from one Monta Team to another or to a user's personal account within the Monta app.
Requirements:
-
Monta Charge app
-
Knowledge of the Team or user's email/phone number (for transfer)
Transferring to Another Team:
-
Open Charge Point Settings: Locate your charge point in the app and access its settings.
-
Find Transfer Option: Look for a section titled "Transfer charge point" or similar.
-
Select "Move to another Team": Choose this option to transfer the charge point to a different Team.
-
Pick Destination Team: Select the Team you want to transfer the charge point to from the available list. (You'll likely need Owner or Admin rights in that Team for successful transfer).
-
Confirm Transfer: Review the details and confirm the transfer by clicking the appropriate button (e.g., "Transfer").
Transferring to a User:
-
Access Charge Point Settings: Follow step 1 from the "Transferring to Another Team" section.
-
Select "Transfer charge point to user": Choose this option to transfer ownership to an individual user.
-
Enter User Information: Provide the email address or phone number of the Monta user you want to transfer the charge point to.
-
Confirm Transfer: Review the details and confirm the transfer by clicking the appropriate button.
Optional Action:
-
Delete Connection: If you no longer want the charge point connected to Monta after transferring it, tick the "Delete Connection" checkbox before confirming the transfer.
Additional Notes:
-
You can only transfer charge points to Teams or users where you have the necessary permissions (e.g., Owner/Admin for Teams).
-
The Monta Help Center may offer more information on specific scenarios or troubleshooting transfer issues.
-
Create an account in the Sync EV app to register your charger.
-
Scan the QR code or enter the PIN provided on the RFID card to register your charger.
-
The app allows you to view charging history, change configurations, and personalize settings.
-
Only one primary user can be registered per charger on a home installation.
-
The app can be shared on multiple devices using the same login credentials.
-
You can assign RFID cards for charging authorization through the app (charger needs to be connected to the network).
-
Go to the "Menu" > "RFID Cards" section in the app.
-
You can scan the QR code, enter the ID manually, or tap the card on the charger to assign it.
-
Assigned cards will be listed in the "RFID Card" menu.
-
You can enable an "Authentication" option in the app to require user approval before charging starts.
-
This prevents unauthorized charging sessions.
-
Go to "Configurations" > "Authentication" in the app and set it to "Required".
-
The charger has a default maximum output of 7.4 kW (32A).
-
You can adjust the rate in the app based on your needs (except with load management).
-
The actual charging rate depends on your vehicle's onboard charger.
-
If the rate is lower than expected, check vehicle settings and cable rating.
-
The app can track electricity cost, but this feature is not currently active.
-
Once activated, you'll be prompted to update the app and historical data will be updated with your cost information.
-
Firmware updates are automatic via the network.
-
The charger needs to be connected, available, and without a cable plugged in for updates.
-
If you contact support for a firmware-related issue, they can upload the update directly.
-
BG SyncEV doesn't directly handle installations.
-
Visit our website and choose "Home Charging" or "Workplace Charging" to find approved installers in your area.
-
They will contact you to discuss your needs and provide pricing and lead times.
-
Contact support and provide your name, address, and charger serial number.
-
They will give you the QR code, PIN (if needed), and arrange a replacement card.
-
You can also purchase additional cards from BG SyncEV's partners.
-
The app allows you to set a charging schedule for off-peak hours, including pre-integrated options.
-
You can also choose to disable scheduling or use the vehicle's schedule.
-
The charger prioritizes cost-effectiveness by delaying the start until the scheduled time.
-
An alternative trickle charge option is available.
-
Avoid setting schedules on both the app and vehicle to prevent conflicts.
-
Battery percentage charging needs to be set on the vehicle itself.